 Student Affairs
The SOLUS Student Centre is designed to provide you with the tools to manage all of your admission, registration, academic, financial, and personal information/contact details during – and after – your academic career at Queen's.
Find information on how to access and navigate the SOLUS Student Centre.
SOLUS is a Gaelic word that means "knowledge and light." It also stands for "Student On Line University System."
The SOLUS Student Centre is the primary means by which online services are provided to students. Whether you are new to Queen’s, or are a returning student, you will access SOLUS for a variety of things – from checking your fees, to selecting your classes, to viewing your class and exam schedules, to downloading forms for Enrolment Verification and Income Tax purposes.
As with any technology, the more you use a service the more comfortable you become with it.
We encourage you to take the time to navigate SOLUS on your own – click on the various links within the Student Centre and see where they lead.
SOLUS Overview
On your SOLUS Student Centre, you will find tiles containing information about your student record. Here is a brief summary of what each tile contains:
- Admissions – information on your admission status
- Academic Records – view your course history, your grades, produce an unofficial transcript, order an official transcript, produce a verification of enrolment, do program/plan selection, view your transfer credits, apply for transfer credits
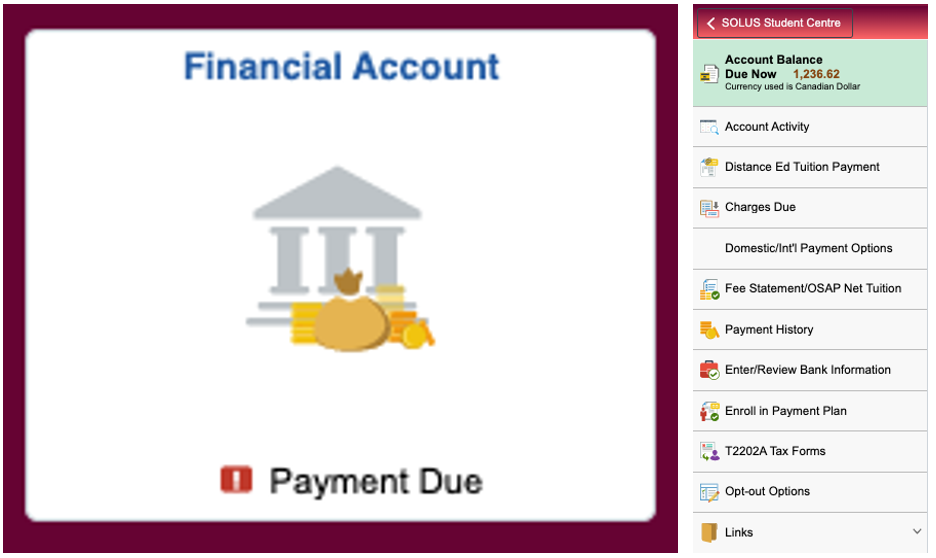
- Financial Account – view charges owing, view due dates, review your payment history, produce a fee statement, enrol in payment plan (only available to graduate students), enter your banking information, opt out process, produce T2202A
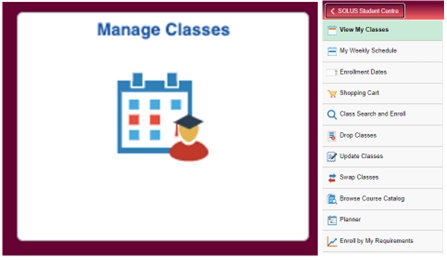
- Manage Classes – current enrolments; Enrolment Appointment Time (if applicable) and Open Enrolment Dates; your Shopping Cart; search and enrol in classes; drop classes; course catalogue; view your Planner, Academic Advisement Report
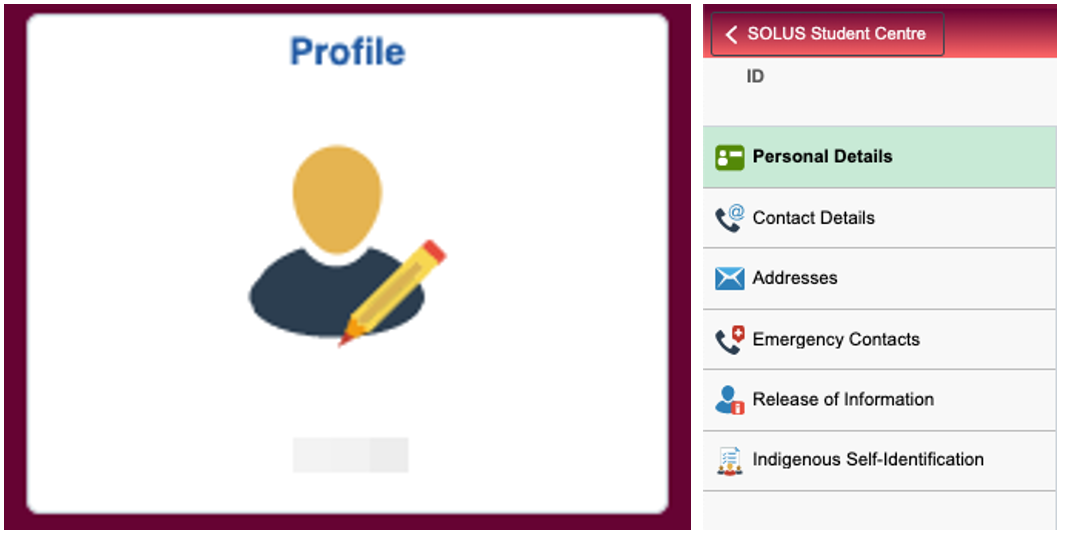
- Profile – contains your biographic information (name, address, phone number, emergency contact, release of information, and indigenous self-identification)
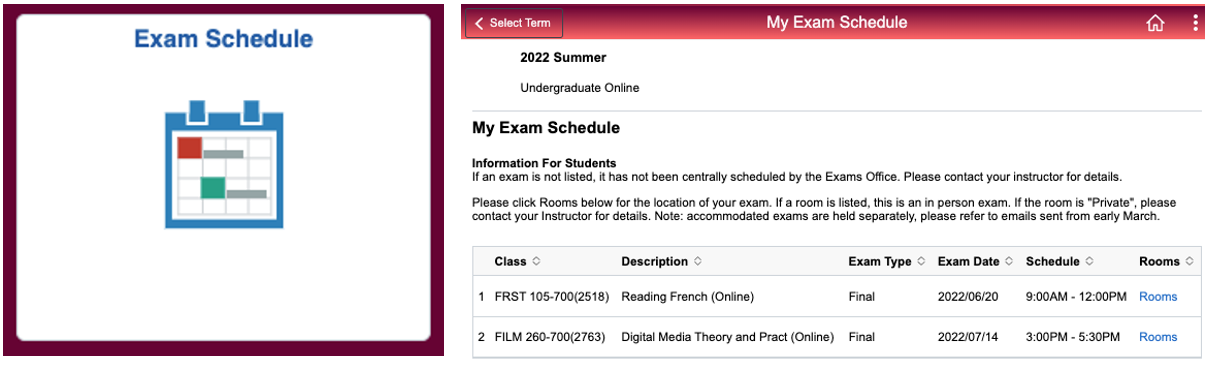
- Exam Schedule – view your exam schedule (available at specific times of year)
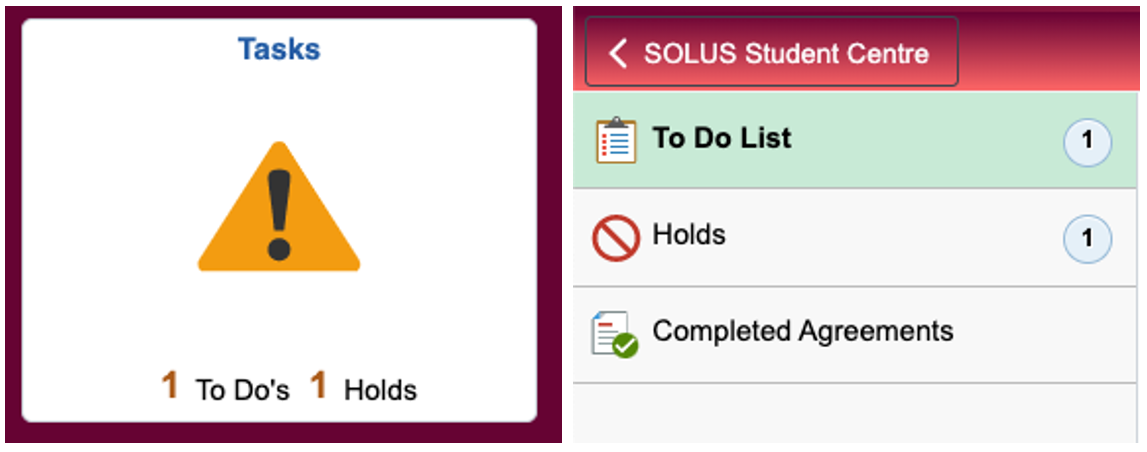
- Tasks – list of tasks that require your attention
- Graduation – apply to graduate and monitor application status
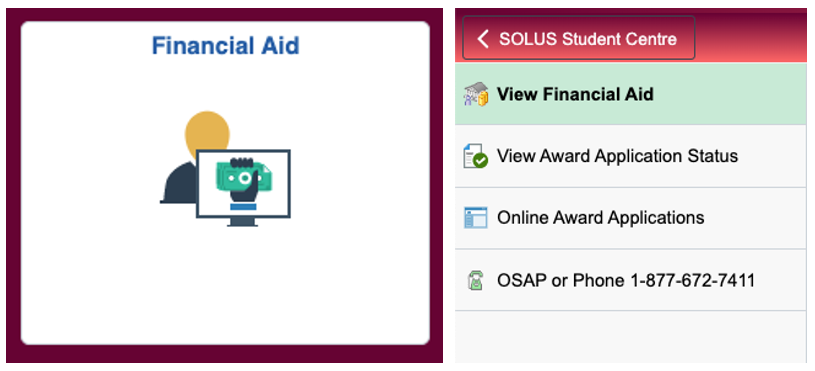
- Financial Aid – view your account balances, payments, produce a fee statement
- Links for Queen's – Queen’s web links that you may find useful
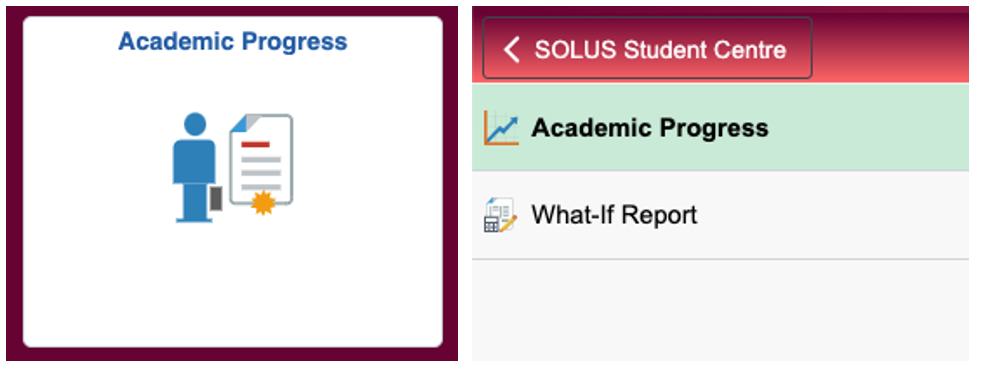
- Academic Progress – track your progress, produce an advisement report, produce a ‘what-if’ report
On your SOLUS Student Centre, you will find tiles containing information about your student record. Each tile features several navigation headings. Here is a brief guide on each tile and their navigations:
Admissions
- Includes information on admission status including application status, financial aid offers, applying for admissions, and supporting documentation

Academic Records
- Includes academic information such as course history, grades, transcripts, enrolment verification, program/plan selection, and transfer credits

Financial Account
-
Includes outstanding charges, due dates, payment history, fee statements, graduate payment plans, banking information, opt-out processes, and T2202A production
-
Notes:
-
Distance Ed Tuition Payment navigation only appears if you are registered in a distance studies career
-
Charges due will only appear if there is an outstanding balance
-
-
Manage Classes
-
Includes information on current enrolments, weekly schedules, enrolment appointment times, open enrolment dates, course shopping cart, class searching and enrolling, dropping classes, course catalogue, planner, and academic advisor report
Profile
-
Includes biographical information
Exam Schedule
-
Provides exam schedule and relevant details for each final exam. Available at specific times of the year
Tasks
-
List of tasks which require attention
-
Notes:
-
To Do List only appears if there is an incomplete Activity Guide or Checklist item. For example:
-
Social Insurance Number Collection
-
Updating Student Contact Information
-
Student Code of Conduct
-
Queen’s Student ID Card Terms of Service
-
-
Holds will only appear if there is a hold on the account. For example:
-
Financial hold due to outstanding fees owing
-
Academic hold due to poor academic standing
-
-
Completed Agreements will only appear if there is at least one complete Activity Guide item
-
Graduation
-
Includes graduation application and convocation details

Financial Aid
-
Includes information on financial aid received, award applications, and financial aid services available
Links for Queen's
-
Includes links to helpful Queen’s websites, including SOLUS help, library services, and academic calendars

Academic Progress
-
Includes information on academic progress and produce a “What-If” Report.
-
Note: Changing program of study may impact academic progress. The “What-If” Report is a tool to simulate a “what-if” degree progress report based on alternate programs of study.
-
Getting Set Up
Your NetID
To log in to SOLUS, you will be asked to provide your NetID and password.
Some people, including alumni, may not remember their NetID, while others may never have been issued one while they were students.
The NetID is an issued combination of letters and numbers which is unique to each student. Think of it as your individual passkey to unlocking online services from Queen's.
If you don't have a NetID, you can activate one.
This utility will require two things – one of which is your Student ID Number. If you do not remember your Student ID Number, you can contact the Office of the University Registrar at 613-533-6894. Once we have verified your identity by asking you a number of questions, we will provide you with your student number. In order to ensure your privacy, we will not provide student numbers by email.
If you have your NetID, and don't remember your password, you can do either of the following:
- If you created your Challenge Questions and supplied an Alternate Email Address, you can use the Self-Service Password Reset Tool
- If you did not create your Challenge Questions and did not supply an Alternate Email Address, you will have to contact the IT Support Centre by completing the Online Help Form
Logging into the SOLUS Student Centre
- Click on the "Search and Sign In" icon located in the top right-hand corner of Queen's affiliated websites
- Select "MyQueen'sU – SOLUS, MyHR and more" from the revealed menu
- Select the "SOLUS" link from the left hand column
- Log in using your NetID and password
If you are planning on printing forms from SOLUS, please ensure that your web browser (Internet Explorer, Mozilla Firefox, Chrome) is set to allow pop-up windows.
SOLUS generates form requests by producing them in an Adobe pdf format in a new browser window. If your browser is set to block pop-ups, then your forms will not appear on your computer.
In order to help users be able to allow pop-ups, ITS has produced instructions that list the steps involved for various compatible browsers for both the Mac and PC computing environments.
Your file should generate in PDF form in a new window, which you can save or print for your taxation records.
If your file does not generate, please review steps 1 and 2 to ensure that your browser is allowing the new window to be created.
Managing Personal Information
The university relies on the contact information in your SOLUS profile for a number of activities. Listed below are easy steps to ensure that what we have is accurate and up-to-date.
Provincial law (FIPPA) and University Senate policy protect your right to privacy as well as restrict access to your personal information. The university will not release information on a student to a third party – including a parent or guardian – unless they have been given permission by the student. This can also be done via SOLUS by following the instructions below
Stand proud and help strengthen the Indigenous presence at Queen’s!
- Self-identifying allows Queen’s to provide the best programs and opportunities to Indigenous students
- Students can learn more about their culture and/or connect with the growing Indigenous community at Queen’s
- Students can self-identify at any time during their university career
Learn how to self-identify on our Student Registration Guide page.
To update your address, telephone number, or emergency contacts, log into SOLUS Student Centre, and follow the appropriate instructions below:
Addresses
- Select the Profile tile
- Select Addresses
- Current mail address displays on the screen
- To edit the current address, select Current Mail Address
- Within the Edit Address section, update Country, Address, City, Province, and Postal Code
- When finished, select the Save button
- Review the address information to ensure it is correct
- Select the SOLUS Student Centre to return to the main page
Telephone Numbers
- Select the Profile tile
- Select Contact Details navigation
- Current Email and Phone contact displays on the screen
- To add a new phone number, select the + button under the Phone section
- To edit an existing number, select it
- Add or edit the following information on the Add/Edit Phone section:
- Country Code (optional)
- Phone Number
- Extension (optional)
- Preferred (optional)
- When finished, select the Save button
- Review your contact information to ensure it is correct
- Select the SOLUS Student Centre to return to the main page
Emergency Contacts
- Select the Profile tile
- Select the Emergency Contacts navigation
- Select the + button to add a contact, or select an existing contact to edit
- Add or edit the following information on the Edit Contact window:
- Name
- Relationship
- Preferred (checkbox)
- Primary Phone Number
- Other Phone Number (if applicable)
- When finished, select the Save button
- Review the Emergency Contacts information to ensure it is accurate
- Select the SOLUS Student Centre to return to the main page
Please note that students are only able to edit their 'preferred' name via SOLUS. Changes to legal/official names require the submission of a 'Name Change Form' (along with supporting documentation) to the Office of the University Registrar (Records and Services). The form can be downloaded from our Forms page.
- Log into SOLUS Student Centre
- Select the Profile tile
- Select the Personal Details navigation
- Select the + button to add a preferred name, or click an existing preferred name to edit it
- Add or edit the following information on the Add/Edit Name window:
- Prefix (optional)
- First Name
- Middle Name (optional)
- Last Name
- Suffix (optional)
- When finished, select the Save button
- Review the Name information under Personal Details
- Select the SOLUS Student Centre to return to the main page
- Log into SOLUS Student Centre
- Select the Tasks tile
- To Do List displays tasks to be completed
- Select Social Insurance Number Collection
- Review the information regarding the collection of the Social Insurance Number
- Enter your Social Insurance Number
- Select Save button
- Completed Agreement page renders
- If there are remaining tasks, select Tasks to return to the To Do List
- If no outstanding items remain in the To Do List, you will be returned to SOLUS Student Centre main page
- Log into SOLUS Student Centre
- Select the Profile tile
- Select the Personal Details navigation
- Review:
- Date of Birth
- Gender
- Social Insurance Number (Note: Only the last 4 digits will be visible)
- Names (Primary)
- Note: If any of this information is incorrect, please contact the Office of the University Registrar at 613-533-2040, as soon as possible
- Select the SOLUS Student Centre to return to the main page
Your academic and financial information is protected by Ontario government law (FIPPA) and University Senate policy. This means that access to your records will not be given to any individual unless you grant them access.
A student wishing the university to release his/her financial and/or academic information to an individual, including a parent, or to an agency external to the university, may do so through SOLUS. This will be effective until the student cancels the authorization.
Please note that possession of a student's login information (NetID and password) does NOT constitute a permission to access or discuss their personal information. Only the registered student and those named individuals who have been specifically granted access to information can receive this information from our staff.
View/Edit Release of Information Permissions
- Log into SOLUS Student Centre
- Select the Profile tile
- Select Release of Information
- Release information page displays the following sections:
- Section 1: admission, scholarships, and/or awards
- Section 2: academic data
- Section 3: Financial data
- Select the radio button beside “I authorize release of…” within the appropriate section
- Enter the Name(s) and Relationship(s) of the person/people you wish to authorize
- When finished, select the Save button
- Select the SOLUS Student Centre to return to the main page